| | Electrically heated stock waterers | Heat tapes | Selection | Low-energy stock waterers | Alternate energy waterers | Thawing frozen automatic waterers
A reliable, constant supply of good quality water is an essential part of any livestock enterprise.
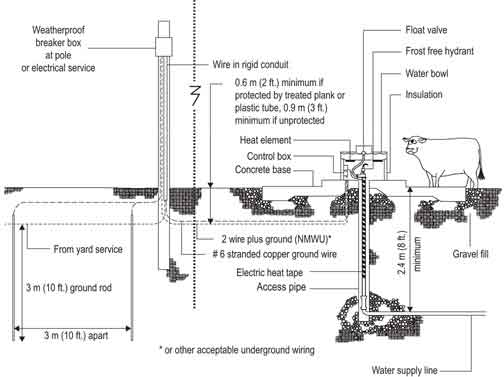
Automatic waterers are standard equipment on most farms because of their convenience and efficiency (Figure 1). They consist of an insulated base and a heated bowl that automatically fills with water from a pressurized line. A float-operated valve controls the level of the water in the bowl. A thermostat, set at 4 to 6° C, regulates the water temperature in the bowl.
Some common waterers include the following:
- electrically heated
- low energy
- alternate energy
The most common automatic livestock waterers are electrically heated, although natural gas and propane heated models are available. Low-energy stock waterers and alternative energy waterers are becoming more common.
The location of the automatic livestock waterer is important for the best operation. Protection from wind and snow reduces energy costs, prevents freeze-up and makes it easier for the animals to use. The ground surface must be graded so that water drains away from the waterer. A concrete pad surrounded by gravel will assist drainage and prevent a mud hole from forming. Locating the waterer on a fenceline can provide service to more than one pen.

Figure 1. Automatic livestock waterer
Electrically Heated Stock Waterers
Installation
Note: Electrical permits are required for all new electrical installations and all extensions to existing installations. Animal electrocutions have resulted from ineffective grounding and improper installation of automatic livestock waterers.
Insurance policies may not cover electrocuted animals if the installation did not have an electrical permit. Stray or tingle voltage in waterers can also cause a slight shock to animals, which can cause animals to refuse to drink from a waterer completely or only drink as a last resort.
Permit applications and farmstead wiring regulations are available from accredited inspection agencies throughout Alberta. Check with your local municipal office regarding inspection agencies for your area.
The following points should be considered when installing an electrically heated waterer:
- Overhead or underground wiring to the waterer should be of adequate size and be on its own 15 Amp breaker. Overhead wiring is subject to minimum clearances over buildings and from ground level (consult with an electrician or electrical inspector). Underground wiring should be plastic-covered NMWU10 and be buried a minimum of 0.6 m (2 ft.) or a minimum 0.9 m (3 ft.) under driveways, etc.
- Where wiring may be contacted (or damaged) by humans or animals, it must be protected by rigid conduit.
- The waterer must be grounded back to the breaker box using #6 stranded copper. Where the waterer has a hinged bowl, the ground wire should be installed on the bowl itself. Electrical regulations require two 3 m (10 ft.) long ground rods at least 3 m (10 ft.) apart.
- A heating tape should be installed around the riser pipe to prevent freezing. The thermostat on the heating tape should be at ground level. Thermal tubes are also available to help prevent riser pipe freezing.
- Most waterers come from the factory with anti-syphoning type valves. Backflow prevention is necessary to prevent back-siphonage of water should the check valve in the pump fail.
- Design the system so the waterer can be shut off in the winter without freezing. Every waterer should have its own shut-off valve. A self-draining wheel hydrant makes an excellent combination supply pipe and shut-off valve. Sometimes it is best to install each waterer on an individual supply line from the central water supply system.
- The waterer needs to be installed on a solid base to prevent movement and subsequent damage to wiring and water lines. A reinforced concrete pad is recommended. A 5 m x 5 m x 15 cm (16 ft. x 16 ft. x 6 in.) thick pad with 10 m (33 ft.) rebar 30.5 cm (12 in.) on centre both ways is suggested. A 45 cm wide by 15 cm high (18 in. x 6 in.) step around the waterer will help prevent manure contamination of the water and corrosion of the waterer frame.
- Caulk or weatherstrip the base of the waterer to the concrete pad to prevent wind penetration.
Maintenance
Every waterer should have its own shut-off valve. Clean and flush the bowl once a week. Keep manure and mud away from the base of the waterer. This maintenance will extend the life of the waterer by preventing corrosion.
Check the following items before turning the power on for the winter.
- wiring for damage, both power supply and grounding circuit
- waterline connections for leaks
- element(s) and thermostat for correct operation
- float and valve for sticking
- base for secure connection to the pad
Energy consumption
A typical automatic livestock waterer will have a 600 to 1,000 watt heating element(s). On the coldest days, the elements will be on for 12 to 24 hours, consuming from 7 to 24 kilowatt hours of electricity. Additional energy costs include the power to supply the pump and the heat tape on the water supply pipe.
Tests done by the Prairie Agricultural Machinery Institute (in Manitoba) showed seasonal electrical consumption of 1,450 kWatt hours and 1,828 kWatt hours on 2 different waterers designed for 150 head of cattle.
More energy-efficient types of waterers can potentially cut energy costs by 20 to 80 per cent, depending on design.
Heat Tapes
Electric heat tapes are an almost essential option on electric stock waterers. A thermostatically controlled heat tape should be installed around the riser pipe with about three turns of heat tape per foot of pipe. The spacing between the spiral turns must not be less than 12 mm (1/2 in.). Heat tape must never cross itself, contact the soil or be exposed to sunlight.
All heat tapes will eventually fail. Since replacement of the heat tape is inevitable, it is important to install the tape so that it can be replaced easily. One way to facilitate replacement is to use a section of plastic pipe, at least one size larger than the riser pipe, as a sleeve. Slit the entire sleeve pipe lengthwise, coil the heat tape around the slit pipe sleeve and slip the assembly over the riser. When the heat tape has to be replaced, simply pull up both the sleeve and the heat tape in one motion.
Selection
Consider the following points when selecting an automatic livestock waterer:
- Make sure the waterer is the correct size for the number of animals.
- Make sure the waterer is well insulated and weatherstripped.
- Repair parts should be available locally.
- The heating element should be easily replaceable.
- The drinking bowl needs to be cleaned easily.
- Adjustable thermostats can be used to save energy costs.
- It must be CSA or CGA approved.
- Floating or hinged covers over the drinking bowl can provide energy savings.
- A heating element immersed in the water or attached directly to the bottom of the bowl will transfer heat from the element to the water more efficiently. The elements on most waterers also warm the entire space enclosed by the base. An element inside the base may help prevent freeze-up of the waterlines if the insulation in the base of the waterer is poor.
- New models of energy-efficient waterers are appearing on the market every year. These waterers usually have extra thick insulation and insulating caps that float on the water. Caps reduce heat loss from the water surface.
- Thermal cover kits are available for some stock waterers to improve efficiency.
- Almost all stock waterers will malfunction and freeze up at some time. The inner components of a waterer must be accessible, even when surrounded with ice and snow.
Low-energy Stock Waterers
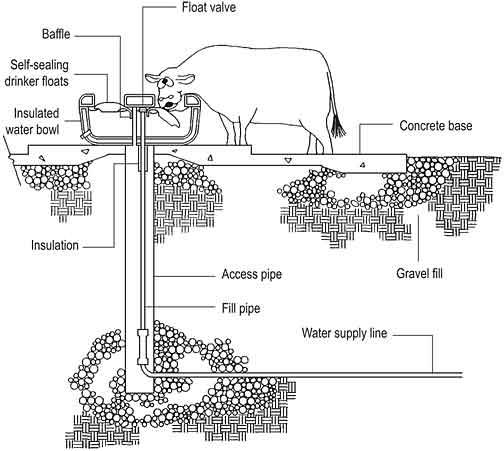
Several types of low-energy waterers are available (Figure 2). These waterers rely on super insulation, insulated covers and large volumes of water to prevent freeze-up.
Some models work very well in Alberta if they are well designed, installed and maintained. They work best when plenty of water is used daily. A minimum of 10 head of cattle or horses is required to cycle in fresh, warmer, water during cold weather.
The water contained in the waterer must be consumed and replaced with warmer water before it freezes. During cold weather, low-energy waterers must be checked at least twice daily: once in the morning, to make sure the insulated covers are not frozen shut, and once at night to make sure the floats are not held open by ice buildup. Ice buildup is significant as cattle dribble water when lifting their heads after drinking.
Proper installation and management is critical in the successful operation of low-energy waterers.

Figure 2. Low-energy waterer
Alternate Energy Waterers
Alternative energy waterers are also available. Several waterers that were originally designed for “off-grid” use have been adapted for use around the farmstead. These waterers are designed to conserve energy by either super-insulating the drinking tank or draining water from the drinking bowl into an underground reservoir below the frost line. Water is then pumped up to the drinking bowl as required.
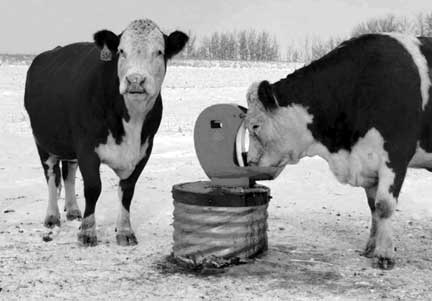
Some units use solar-powered pumps that are activated by motion sensors, another utilizes a nose pump, where the animal pumps its own water out of the reservoir (Figure 3). Both types of drain-back systems can be tied into pressurized water systems. The water level in the below ground reservoir is controlled by a float valve.

Figure 3. Winterized nose pump
Thawing Frozen Automatic Waterers
Automatic waterers will freeze in the winter if the power, heating element or heat tape fails. Waterers that freeze early in the winter can usually be thawed by simply turning the thermostat to a high setting and plugging in the heat tape.
If this method does not work, temporarily install an in-car warmer in the waterer base. Some farmers have successfully thawed riser pipes by attaching a rubber hose to the exhaust pipe of a vehicle and running this hose down the casing that surrounds the riser pipe. The heat of the exhaust will thaw the line.
Low-energy waterers are usually thawed using hot water.
Prepared by
Alberta Agriculture and Rural Development
For more information
Alberta Ag-Info Centre
Call toll-free: 310-FARM (3276)
Website: www.agriculture.alberta.ca
Source: Agdex 716 (C52). Revised December 2008. |
|